This is an old revision of the document!
Table of Contents
How to Setup Ubuntu for PPA automation (based on Ubunut 14.04.1)
| Reference | Vmplayer |
Basic Setup
apt-get proxy configure
configure proxy: /etc/apt/atp.conf
 Acquire::http::proxy "http://proxyconf.xxx.com:81/";
 Acquire::https::proxy "https://proxyconf.xxx.com:81/";
 Acquire::ftp::proxy "ftp://proxyconf.xxx.com:81/";
 Acquire::socks::proxy "socks://proxyconf.xxx.com:81/";
then run below command to downloads the package lists from the repositories and “updates” them to get information on the newest versions of packages and their dependencies:
sudo apt-get update
Install vmware tools
In vmplayer menu, select player → Manage → ReInstall VMWare Tool.
Then it will mount a CDROM under Ubuntu VM.

Right on the mounted VMware Tools folder & click on “Extract to” to extract VMware tools files.
run:
sudo ./vmware-install.p
Note:
- it is very important to install vmware tools, otherwise the vmplayer windows size is fixed and very small.
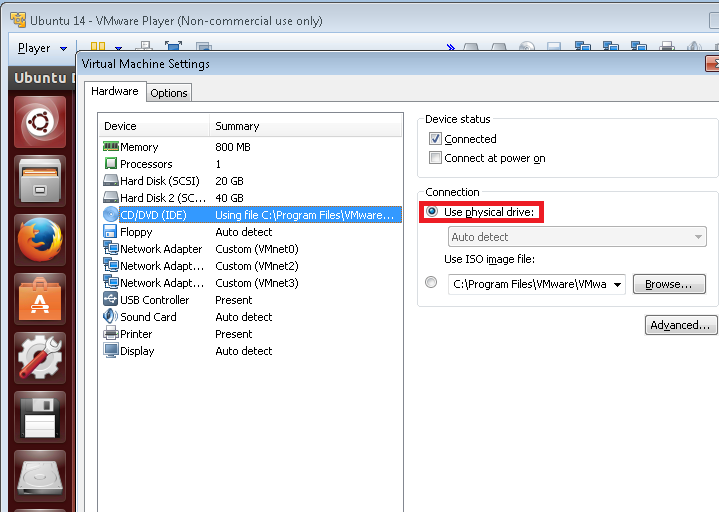
- Sometimes downloading vmware tools will fail, in this case, must power down the virtual machine and change CD/DVD to use physical drive, like below

vim
sudo apt-get install vim
install xinetd
sudo apt-get install xinetd
ssh server
sudo apt-get install openssh-server
vsftpd server
sudo apt-get install vsftpd
Modify /etc/vsftpd.conf file and make changes as follows:
Uncomment the below lines (line no:29 and 33).
 write_enable=YES
 local_umask=022
Uncomment the below line (line no: 120 ) to prevent access to the other folders outside the Home directory.
chroot_local_user=YES
and add the following line at the end.
allow_writeable_chroot=YES
Add the following lines to enable passive mode.
 pasv_enable=Yes
 pasv_min_port=40000
 pasv_max_port=40100
Restart vsftpd service:
sudo service vsftpd restart
tftpd
sudo apt-get install xinetd tftpd tftp
Create /etc/xinetd.d/tftp and put this entry
service tftp
{
protocol        = udp
port            = 69
socket_type     = dgram
wait            = yes
user            = nobody
server          = /usr/sbin/in.tftpd
server_args     = /tftpboot
disable         = no
}
sudo mkdir /tftpboot
sudo chmod -R 777 /tftpboot
sudo chown -R nobody /tftpboot
sudo /etc/init.d/xinetd restart
svn/subversion
sudo apt-get install subversion
Samba
sudo apt-get install samba
configuration
twiki installation and support
Manually download the TWKI, for example currently TWIKI is v6.1
cp /var/www/html/twiki/bin/LocalLib.cfg.txt /var/www/html/twiki/bin/LocalLib.cfg
chown -R www-data:www-data /var/www/html/twiki
wireshark
sudo apt-get install wireshark
Python
sudo apt-get install python
perl
sudo apt-get install perl
Tcl
sudo apt-get install tcl
Awk
sudo apt-get install original-awk
grep
sudo apt-get install grep
Expect
sudo apt-get install expect
Network Protocol / Tunnel
vlan
sudo apt-get install vlan
pppoe
sudo apt-get install pppoe
xl2tpd
sudo apt-get install xl2tpd
Disable Network Manager
| Network Manager Configuration File | /etc/NetworkManager/NetworkManager.conf | |
| Network interface configuration file | /etc/network/interfaces | any interface not listed there will remain under Network Manager control. |
Partial Disable Network Manager
Since any interface not listed in /etc/network/interfaces will remain under Network Manager control, we just move some interface into /etc/network/interfaces to make these interface not under Network Manager control.
For example, below interfaces will not be controlled by Network Manager:
auto eth1
iface eth1 inet dhcp

auto eth2
iface eth1 inet static
Fully Disable Network Manager
sudo service network-manager stop
sudo service network-manager start
Totally Remove Network Manager
sudo apt-get remove network-manager
meld
install linux compare tool meld:
sudo apt-get install meld
beyond compare
sudo apt-get update
sudo apt-get install gdebi
Manually download beyond compare via firefox from , for example bcompare-4.0.0.18847_i386.deb
sudo gdebi /xxx/xxx/bcompare-4.0.0.18847_i386.deb
apache2 / httpd
sudo apt-get install apache2
sudo service apache2 restart
Note: In order to execute cgi instead of text display or download, it needs to run:
sudo a2enmod cgi
sudo service apache2 restart
Configure apache before install new Twiki
- Mount 2nd virtual machine (data disk only)
  [ ! -d /mnt/data ] && mkdir /mnt/data
  sudo mount /dev/sdb1 /mnt/data/

* create soft link from /mnt/data/www  to /var/www
  cd /var/
  sudo mv www www.old
  sudo ln -s /mnt/data/www .

* set up twiki configuration in apache2:
  cd /etc/apache2/sites-enabled
  sudo ln -s /mnt/data/general_bin_httpd.conf .
  sudo ln -s /mnt/data/twiki_httpd.conf .
- restart apache server
sudo service apache2 restart
install new Twiki
Install new TWIKI and make it works
- Download latest TWIKI and extract to /var/www, it will create folder: /var/www/twiki
- sudo cp /var/www/bin/LocalLib.cfg.txt /var/www/bin/LocalLib.cfg
- Modify /var/www/bin/LocalLib.cfg file for Variable $twikiLibPath: Must absolutely folder for it
$twikiLibPath = “/var/www/html/twiki/lib”;
- sudo chown www-data:www-data * -R
- Run Twiki config for the first time:http://localhost/twiki/bin/configure, setup admin password
and paths.
Edit /var/www/html/twiki/bin/LocalLib.cfg:
$twikiLibPath = "/var/www/html/twiki/lib";
Copy old Twiki content to new TWIKI
sudo cp /xxx/old_twiki/data/xxx /var/www/twiki/
sudo cp /xxx/old_twiki/data/xxx /var/www/twiki/
sudo cp /xxx/old_twiki/data/.htpasswd /var/www/twiki/.
sudo chown www-data:www-data /var/www/twiki/* -R
Note : Do not forget to enable cgi.load by
sudo a2enmod cgi sudo service apache2 restart
Enable the conf.d directory created by you for twiki.conf file in apache2.conf file.
issues
Issue 1
- If there are multiple network interfaces, partially or fully disable network manager seems not work, it always some strange behavior happen: for example, after ubuntu bootup, access ubuntu 14.04 via ssh/ftp will fail/refused, also ping the ubuntu is ok. But if we ping from ubuntu to outside PC, then ssh/ftp access works.
- Virtunal machine's windows size cannot be expanded, ie, only supported fixed windows size
Fixing: install vmware tools